Tuesday, June 2, 2015

CASINO ANNIVERSARY AND BABY SHOWER AUCTIONS a NEW twist to OLD GAMES


CASINO 50TH WEDDING ANNIVERSARY AUCTION

    Since 2000 I have tried making our family parties as fun as possible. Even though I loved attending parties I always seemed to be bored with the same ol' games. Well, until someone begins inventing new games...I had to deal with it. HOWEVER...by adding a fun new twist to some old party games I was able to make our parties genuinely fun once again. Here is how I did it. 
     Back in 2011, for my parents 50th Wedding Anniversary Party I had a Casino Themed party, instead of the Baby Shower Paper Bucks (detailed below in Baby Shower AUCTION), I purchased a good amount of Poker chips. 
As each guest arrived, they each got a small bag with 30 chips to play with, period! Win or lose. (Not everyone is a winner in a Casino)
We set up casino type games, i.e., Black Jack, Roulette, and Craps and our guests played like they would in a Casino... winning "game chips". 
Since, not everyone has good luck or plays well at the casino table games, I also placed decks of cards on the tables for those who wanted to play one on one, slowly winning chips from other guests. And, we set up a Keno style Bingo game.  


What I did differently from the Baby Shower AUCTION (below) was AUCTION OFF PRIZES DURING THE PARTY. I purchased prizes months before that actual party in order to keep costs down and to find great deals on great items. Our main prize was a Kindle Fire and Keurig Coffee Machine. These were the prizes that everyone wanted, so, in order to lessen the quantity of potential winners for these prizes, I AUCTIONED off bottles of Wine, a Coach wallet, Gift Certificates and Lottery Scratchers during the party. 
One of my guests won a COACH WALLET FOR 30 POKER CHIPS!! What a steal. All because the other guests were trying to save up till the end. 
Our casino games went on for about 2 hours and when we finally shut them down...people were actually disappointed and plead for more time. 

When the AUCTION began I started seeing guests pull their poker chips together in order to help one person win. I thought to myself that this would cause a ruckus, however, everyone began doing it. (So it is up to you if you want to try and stipulate no sharing chips??, good luck on that). 


One by one lift up a PRIZE and ask who would be willing to spend their poker chips for that gift...the highest bidder wins the prize! The results are HILARIOUS!!! 
My guests were so EXCITED they began screaming out the amount of poker chips they had.


BABY SHOWER AUCTION 


 Back in 2002 when my daughter was ready for her baby shower...the concept of having a baby shower AUCTION happened as I reminisced about the old Antique Auctions I attended at a place called McCoys. The adrenaline of bidding was what kept me going back for more!!! 

Here is how I began. 
1. Instead of purchasing a bunch of little game prizes, I purchased a few larger items. For my daughter's baby shower I purchased a stick Ipod for about $70.00.. yes it was years ago. I also purchased large jars of Yankee candles on Ebay.. so I did not pay full price for them. I purchased a Coach makeup bag, also on Ebay for about $30.00, again not paying full price for it.
2. I printed up "Baby Shower Bucks". Enough to give every guest at least one when they arrive. This is when I explained to them how the event would take place. 
a. You get an initial payment of Baby Shower Bucks 1 or 2 is good enough just for showing up. 
b. For every party game played (i.e., Baby Shower Bingo, or Ice Cube Baby Birth) there would be a 1st, 2nd and 3rd place winner. 1st place would get, let's say a $15.00 baby shower buck, 2nd place would get $10.00 and 3rd place would get $5.00. MY GUESTS WOULD NOT GET A "PRIZE" FOR WINNING... they would get baby shower bucks instead.
c. At the end of the baby shower (Wedding Shower, Birthday, etc) there would be an AUCTION FOR THE PRIZES!! (I.e., the Yankee candles, moving your way up to the biggest prize.. the IPod.) 

One by one lift up a PRIZE and ask who would be willing to spend their baby shower bucks for that gift...the highest bidder wins the prize! The results are HILARIOUS!!! 
My guests were so EXCITED they began screaming out the amount of baby shower bucks they had. 


Tuesday, March 12, 2013

PUBLISHED BOOKS~A LITTLE BIO TIME

KNOB-ITS by Pauline (Rodriguez) Farias
"MY BOOK!"


A little bio time: Years ago I owned my own Crafter's Mall called Country Crafters. It was at the peak of the Country Folk Art era where I learned to design, cut, and paint wooden art. I was first published as a Provo Crafts Artist (Utah) with my first book; "All Keyed Up" (below) and second book; "Calendars", then acquired a publication through Suzanne McNeill (Texas) with KNOB-ITS.
KNOB-ITS was my third and most profitable published book. It reached all over the world, especially Singapore in which I cut, and painted over 4,000 of these drawer pulls for Derek Khaw. I was featured in Country Sampler and Country Folk Art magazines as well as running my own mail order business. This idea of drawer pulls hit Target, and other retail stores in ceramic form. I just found my books on Amazon and Ebay for discounted prices :( and as it brought back many wonderful memories, I thought I would share. 

"ALL KEYED UP" Provo Crafts
 by Pauline (Rodriguez) Farias
"My 1st Book"


Thursday, March 7, 2013

POCKET OF LOVE

POCKET OF LOVE  

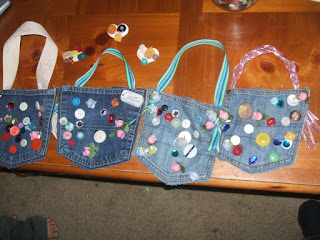
I recently found an old classic photo of a Valentine's project my preschool class did about 15 years ago. The children made re-purposed Levi Pockets Of Love as gifts for their mothers. We filled the Pockets of Love with candy kisses, a photo of themselves and a button heart brooch pinned to the front of them. I say classic because when I found the old photo...I loved them all over again. Here is the idea, let's see how you can elaborate upon it :) 

Skies the limit with the decorative pieces you can glue onto your pocket. Buttons, silk flowers, lace, ribbon, sequin, etc. 
I found that Tacky Glue worked the best:) 

You can punch holes at each corner of the pocket, slip through a ribbon handle and knot. Now, mommy can carry her Pocket of Love home. 


Tuesday, January 8, 2013

IN THE FARM YARD BULLETIN BOARD IDEA

IN THE FARM YARD
An Interactive Bulletin Board

Although the photo speaks for itself, I would like to say that this was one of our classroom's most fun and successful  boards to date. The children were involved, eager to participate and 'sad' when the farm had to come down. 

Trying to give the farm a realistic view, I crinkled the brown paper and folded it to make 'field rows' for planting our bean crops. 
The first set of 'green' mountains (background) were flat and smooth, the second row of 'green' mountains (forefront) were also crinkled to give some dimension and depth. 

The barn was made larger on purpose to make the field, mountains and animals look like they were further away:) 
The children's artwork then went up. The cows were drawn, and painted by the children. The pigs were part of a 'gluing' project...


The sheep were made from bowls (not plates) to help with our 3-D effect
Our rooster project entailed, painting a paper plate, folding it, and gluing feathers and features...
The children had a few questions on as to 'how' and 'why' the rooster was up in the loft? (Great teaching moment on farm life) 

And finally... 
our science experiment! The children were allowed to wet their paper towels, and place both towel and 'bean' inside a baggy. I then stapled them to the 'dirt field'. And we watched them grow...

...water them (just a spray bottle with water)...
watch them grow some more...
:)

We worked on and studied farm life for a month and when it had to come down, we transplanted our bean sprouts into paper cups and the children got to take them home... along with all their farm animals. 
The End.


Thursday, October 25, 2012

SNOWMAN LOLLIPOP STAND

SNOWMAN LOLLIPOP STAND

The saying, "NECESSITY IS THE MOTHER OF INVENTION" is the concept I am going to share with you today :) 
Candy Shoppe, Candy Bar, Candy Stands are NOT a new idea. I have been to baby showers, weddings, and birthday parties that have all used this 'sweet' idea over the years, BUT, if you are getting to know me a little, you know that I LOVE recycling, repurposing, and reinventing inexpensively. 
This year I was given the task of decorating my family's home for Christmas and to make it as memorable as possible for the kids and adults alike. So, "what a perfect time to bring out the Candy Shoppe!" I have purchased pounds of candy, decorations, and now am working on the displays. Well, I purchased bags of lollipops and could not figure out how to display them without having to purchase a ready made stand. The cheapest one I found was $30.00 with s/h charges. I then went to the hardware store and priced what I needed to make my own, and that came out to about $20.00ish. Ugg! 
My thought bubble read..."How?? and how cheap??"...and whalaa! My new invention:) 


1) I purchased an old paper towel holder at a local vintage shop for $1.00 that I plan on painting. 


2) If you have read my whole BLOG you would have seen another idea where I created "Oodles of Noodles" using swimming noodles. Swimming Noodles are so multi-purposeful!! It was the ready made hole in the center that caught my attention to the foam noodles, "It fit perfectly snug over the paper towel dowel!" (Note: I am using my Oodles of Noodles pieces to create this stand but would purchase a new noodle to get precise noodle measurement) I purchased the swimming noodles at the Dollar Tree for :) ... a dollar. So, with the paper towel stand and the swimming noodle I have invested $2.00 so far. 
3. Push your swimming noodle down the paper towel dowel and cut to precise measurement.
4. Starting from the bottom going upward, push your lollipop sticks into the foam noodle at a slight angle. This is so quick and easy!
You will be done in no time
There are about 100 lollipops on this stand!! And, I only used about 1/4 of the swimming noodle, so, for a $1.00 swimming noodle, you can make about 4 stands!! That's 25 cents for each stand. I am now trying to figure out a "broom stick size lollipop stand!!" 
Okay...so on top of it all... while I was at the vintage shop, I purchased this wooden snowman for $1.98 (original tag $12.99) and WAS A PERFECT TOPPER for this project!! 
$30.00 NOT!
$20.00ish NOT!

My version

$1.00 Paper towel holder
$.25 worth of swimming noodle
$1.98 Snowman topper
____________________________
= $3.23 YES!!! 

SUCCESSFULLY RE-PURPOSED INEXPENSIVELY!! 

......
CANDY SHOPPE ...NOW OPEN!!


Sunday, September 30, 2012

HANDS IN THE HEART: MY VERSION OF A CLASSIC

HANDS IN THE HEART


Recycle, Recycle, Recycle!! I always keep a little stash of those mismatched borders knowing I will use them "one day" :) Well, here is a way I have used them over the years.  

Materials are simple. The borders, stapler, plaster of paris, paint, ribbon and silk leaves. 

Fold the border in half and staple it about 1/2 inch from the folded end. Then bring the unstapled ends around the top and down to make the point of the heart. Staple the two ends when you reach the desired size of heart to make your hand mold. You can ask the child to insert his hand into the center of the heart and adjust before stapling. Some hearts will be smaller than others. 

Instead of making the mold in "white" plaster of paris...I applied a large spoonful of Colorations paints into the plaster while mixing "before" having the child insert his hand into the plaster. 

When the plaster of paris is dried, paint the handprints "white". A reverse process from most plastered hand prints, but it gives a nice effect. At this point, make two holes for hanging, large enough to insert your ribbon. I used a straw to make mine. 

Whaala!! :)

Next, push your ribbon (from the back to the front) through the two hanging holes.  To achieve the rosebud knots, I left about 3 inches of ribbon sticking out in front of the heart, then rolled the ribbon ends into a ball and glued. Don't forget the leaves :)...glue silk leaves under the rosebud knots. (Optional: You can spray the painted hearts with a high or satin gloss of Clear Coat Krylon varnish to give a glass like shine:) 

Here is the results! This is a beautiful gift for any parent, friend, grandparent, etc.... for any occassion. :)

Pretty in Pink :) 

Hands in the Heart: My Version of a Classic
By Pauline Farias :)